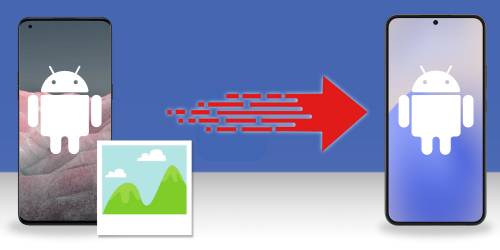
Having your photo library at your fingertips should be expected in this day and age. With this in mind, Android users will often wonder what the best way is to transfer photos from Android to their PC.
There are loads of different ways to accomplish this task, which can be overwhelming. Each method has its pros and cons, so we've put together a list of the best options, to help you decide which is best for you.
Quick jump to any of the sections in the guide:
Method 1: USB Transfer
One of the fastest ways to transfer pictures from Android to PC is to use File Explorer and a USB cable.
File Explorer is the file manager app on Windows PCs. Using this app, you can drag and drop photos from your Android to your computer.
How to transfer photos from Android to PC using USB cable
-
Connect your Android to your PC using a USB cable.
-
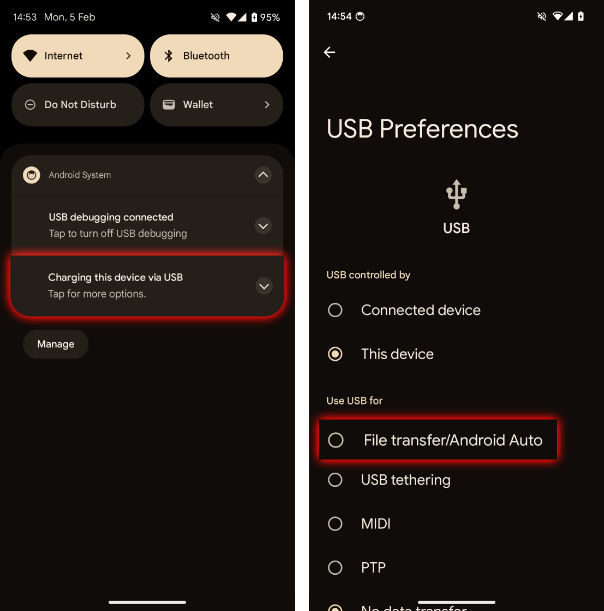
On your device, swipe down from the top of the screen and tap 'Charging this device via USB'.
-
Under 'Use USB for' select 'File Transfer'.
-
Open File Explorer on your PC and select your Android device.
-
Select the photos you want to transfer.
You can find your photos by navigating to Internal Storage / SD Card, then to DCIM or Pictures. Here you may have a 'Camera' folder containing photos you've taken on the device, or other folders containing other pictures.
-
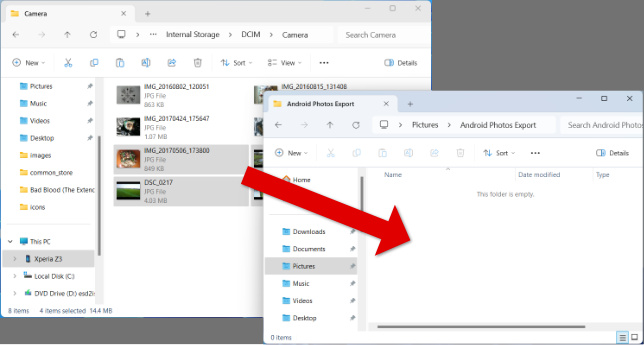
Drag and drop the photos to your desired folder on the PC.
You can open a second File Explorer window by right-clicking the File Explorer icon in your toolbar and clicking 'File Explorer'.
In this second window, navigate to the location you want to save your Android photos to. You can create a new folder for them if you wish.
Finally, click and hold your selected photos in the first window, and drag and drop them into your chosen location in the second window.
Pros
- Direct transfer with USB cable.
- Quick and easy with drag and drop.
- Copy photo albums to maintain album structure.
Cons
- Unable to copy photos from messages.
- Cannot perform a differential photo backup.
- Unable to group photos by date.
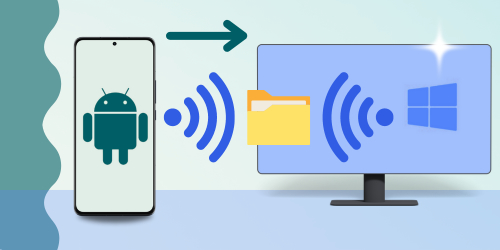
Method 2: Wi-Fi Transfer
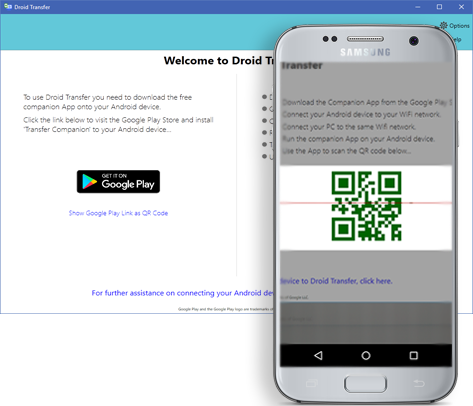
To transfer photos from Android to your PC via Wi-Fi, you will need an app like Droid Transfer to make the wireless connection between the two devices.
Droid Transfer for Windows (alongside the Transfer Companion app for Android) offers more control over your photo management and is far more user-friendly than any other method in this guide.
How to transfer photos from Android to PC via Wi-Fi
-
Ensure both devices are connected to the same internet connection, via ethernet and/or Wi-Fi.
-
Open Transfer Companion on your Android device and Droid Transfer on your PC.
If you don't already have them, you can download both applications for free.
-
Tap "Scan Droid Transfer QR code" on your Android and use the camera to scan the code shown in Droid Transfer on your PC.
-
Click the "Photos" category in Droid Transfer on your PC.
-
Select the photos you want to copy.
- Select individual photos.
- Click an Album or photo category (camera roll, download, screenshots...) to select it.
- Select all photos in your current view with Ctrl + A on your keyboard
-
Copy the selected photos to your PC.
In the toolbar at the top of Droid Transfer, you can select "Copy Photos to PC" and choose which folder to put your selected images into.
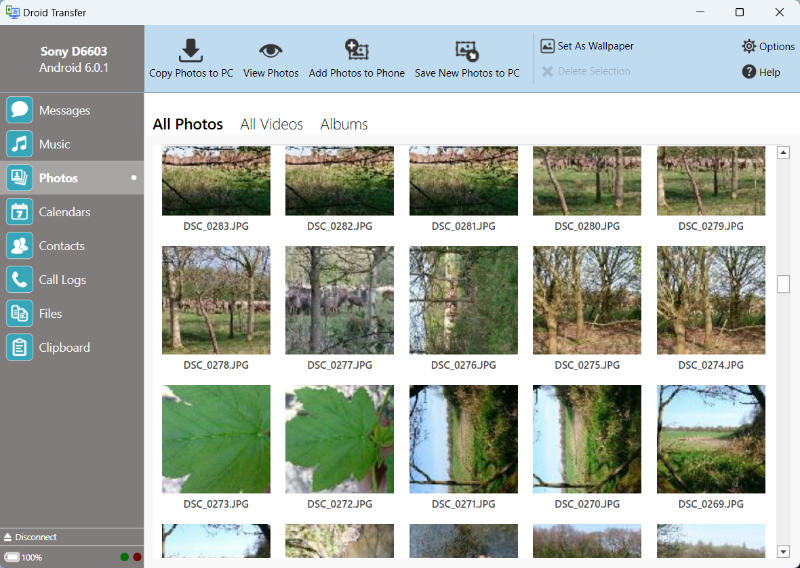
Your photos will be copied in the same quality as they are stored on your device. Droid Transfer can back up all image formats, from JPEG, PNG, animated GIFs, WebP formats, and more!
Differential Photo Backups with Droid Transfer
To regularly back up Android photos to your PC, utilize the 'Save New Photos To PC' feature in Droid Transfer. When connecting your Android to Droid Transfer, it will display new photos since the last backup, enabling you to selectively copy only unsaved photos to your PC.
When saving new photos, you'll have the incredibly useful option to group your photos by date. Choose to save your selected photos into separate folders based on the year/month/day they were taken.
After backing up your photos in this way, you'll be prompted whether you'd like to delete those photos from your Android that you've saved to your PC. This is a fantastic way to clear some valuable space on your Android device!

Other notable Droid Transfer photo management features
- If you have photos on your PC that you'd like to have access to on your phone, use the 'Add Photos to Phone' feature.
- Delete photos you no longer need. This is great for clearing space on your device after backing up your important photos.
- You can even save images from within text messages with Droid Transfer, allowing you to save photos which may not be available to copy using other methods in this guide.
Watch the video on how to transfer photos using Droid Transfer:
Pros
- Direct transfers from Android to PC.
- Choice of wireless (Wi-Fi) and wired (USB cable) connection.
- Import selected photos or regularly back up new photos.
- Delete photos from Android which have been backed up to PC.
- Copy photo albums to maintain album structure.
- Organize photos by day/month/year.
- Ability to save photos from text messages.
Cons
- Purchase required for full license - free demo available allowing for up to 100 free photo transfers.
Method 3: Sync using Google Photos
Google Photos is a service which allows you to store and share photos between your devices.
The great thing about this method is that you can automatically sync your photos. So, once you have it set up, you don't have to worry about manually copying your photos, as long as you have enough Google Photos storage space.
You get 15GB of free storage with your Google account. This storage is shared between all Google One apps (Google Drive, Google Photos and Gmail). If you need more space to store your Android photos, you'll need to subscribe to a paid plan.
How to sync photos from Android to PC with Google Photos
-
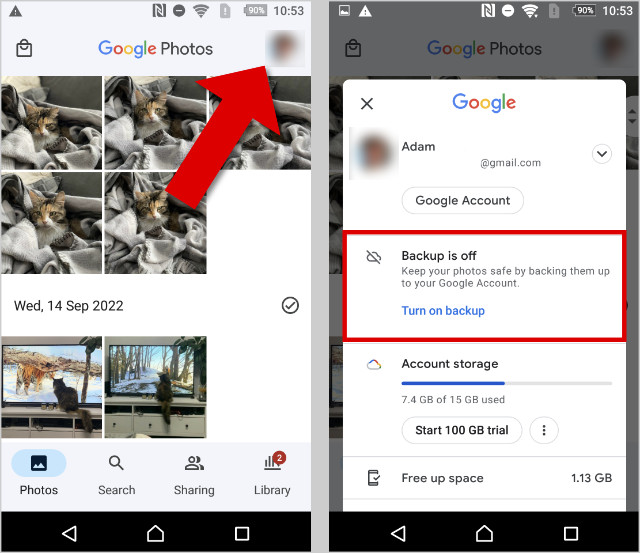
Open the Google Photos app on your Android device.
-
Sign into your Google account if you are not already.
-
Tap your profile picture or initial to open the menu.
-
If you see 'Backup is off', tap 'Turn on backup'.
-
Tap 'Turn on backup' again to begin backing up your photos.
The backup can take some time depending on how many photos and videos you have on your device. Ensure that you maintain a Wi-Fi connection during the backup.
-
Once the backup is complete, open your internet browser on your PC.
-
Visit photos.google.com and log into your Google account.
Here you can see all the photos that you've synced from your Android device.
-
Download your photos to your PC.
Select the photos you want to copy by clicking the circle on them. You can select a batch of photos by clicking the circle on one photo, holding the Shift key on your keyboard, and then clicking the circle on a photo further down your list.
With your desired photos selected, click the 3-dot menu, and choose 'Download'.
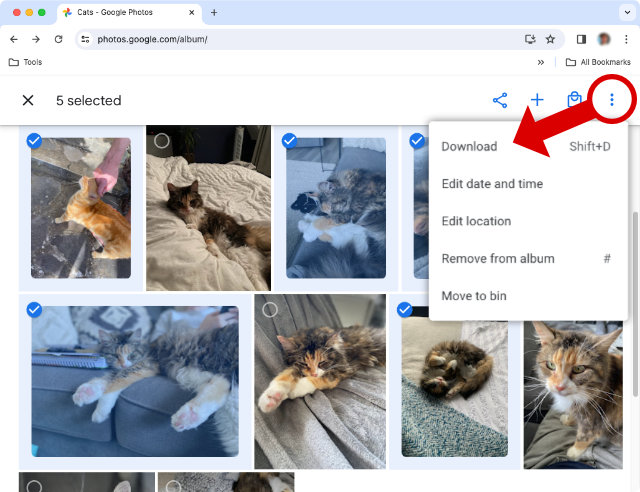
Downloading photos from Google Photos is limited to a maximum of 500 photos per download operation.
Tip: Downloading large batches of photos
If you need to download more than 500 photos, you may want to consider the Google Takeout service instead. Takeout enables you to make a copy of your entire Google Photos library and save it to your computer in a ZIP file.
Note that albums are not maintained when downloading your photos using Google Takeout. Photos are instead saved to folders by the year they were taken.
Pros
- Automatically have access to your photos on any device.
- Copy photo albums to maintain album structure.
Cons
- Limited free storage - paid subscription required for more.
- Requires an internet connection for use, so can make new photos unavailable when offline, or photo syncing slow on a bad connection.
- Google Photos limits downloads to only 500 per operation.
Method 4: Bluetooth Transfer
If you are unable to connect your device via a USB cable or Wi-Fi, you can use Bluetooth instead.
Setting up Bluetooth requires the most effort of the methods covered in this guide, but once it is set up, transferring files from Android to PC wirelessly is easy.
Step 1: Set up Bluetooth on your devices
-
Turn on Bluetooth on your Android.
Go to Settings > Bluetooth and tap to toggle Bluetooth ON.
Ensure your device is set to be 'discoverable'.
-
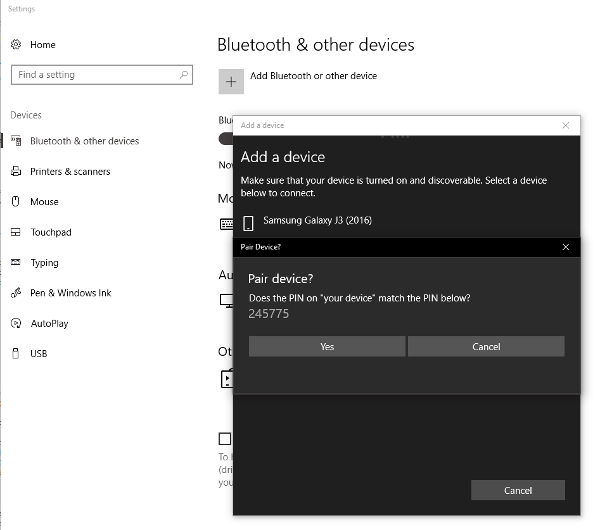
Turn on Bluetooth on your PC.
Go to Start > Settings > Bluetooth & Devices. Here, turn Bluetooth ON.
-
Pair the devices.
On the PC, click 'Add device' > 'Bluetooth' and select your Android device.
If the security code provided on the PC matches the code shown on the Android, click 'Connect' or 'Yes' on the PC, and 'Pair' on the Android to confirm.
-
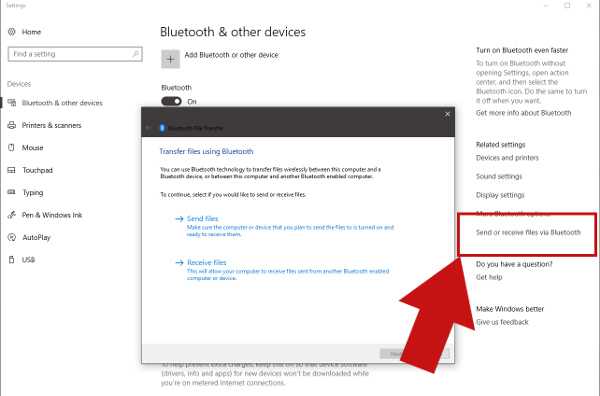
Set file transfer permissions
Click 'Send or receive files via Bluetooth' within your PC's Bluetooth settings. Then select 'Receive files'.
Step 2: How to transfer photos from Android to PC via Bluetooth
-
Open the Photos app on your Android device.
-
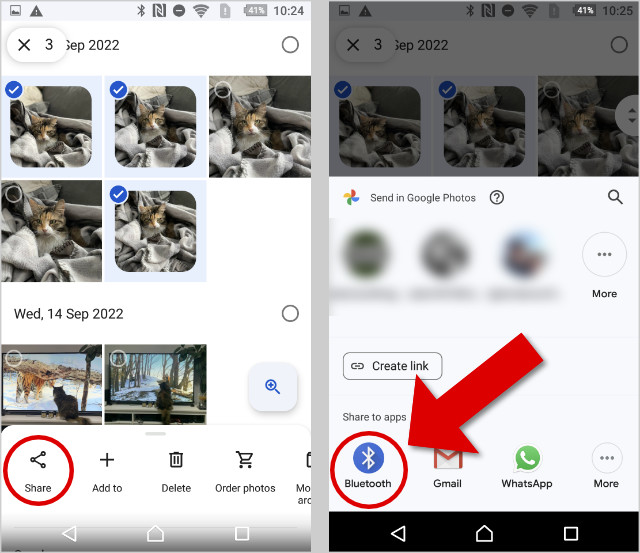
Select the photos you want to transfer.
You can select photos by date, by album, or by individual photos.
-
Tap 'Share' and then choose 'Bluetooth'.
-
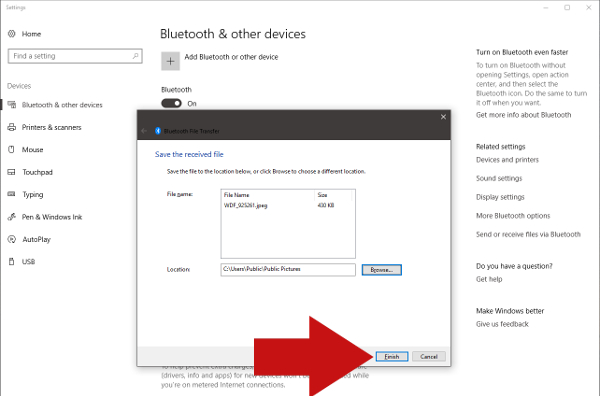
Accept the file transfer on the PC.
You'll receive a notification on your PC that files are being shared with you via Bluetooth.
Select a location on your PC to save your photos to, then click 'Finish'.
Pros
- Does not require USB or Wi-Fi.
- Direct transfers from Android to PC.
Cons
- Slower transfer speed compared to USB cable or Wi-Fi options.
- The initial setup and pairing process is time-consuming.
- Unable to send/maintain album structure.
- Connection can be unreliable, which makes large/batch transfers difficult.
Conclusion
There are numerous other ways to transfer photos from Android to PC, but we have covered the best ones that we have found and tested for this guide.
You should now have all the necessary information to select the method that suits you most. If you still find yourself uncertain, here are our suggestions:
- Droid Transfer is the most robust and feature-rich option. The app gives you the power to copy any kind of content from Android to PC from photos and videos, to messages and call history and more. Droid Transfer gives you full control over how to copy your photos, perform regular backups, maintain albums, and even copy photos sent/received from text messages.
- Using a USB cable with File Explorer to drag and drop your photos can be easy and convenient for many users, but lacks the control, features, interface and connectivity options offered by Droid Transfer.
- And if you want to set up photo syncing once, then forget about it - Google Photos is fantastic. You'll always have your photos available to you on any device using this method - just keep an eye on your storage space, because if you run out, you'll not be able to store any new photos, emails (via Gmail) or files (via Google Drive)!
Thanks for reading!
Wide Angle Software