With increasing file sizes as camera quality improves, Android devices’ internal storage space often proves insufficient in meeting the needs of daily users. SD cards can be a convenient and efficient solution to storage problems on Android devices.
Older Android devices often have SD card slots, while newer ones often do not – so, how do we use SD cards in both of these instances?
This guide shows several ways to transfer Android photos to SD cards, so if you need a backup of your media, or need to save your photos elsewhere before deleting them to clear space, read on to find out how to do just that.
Quick jump to any of the sections in the guide:
1. Direct Transfer using Android Files app
Many Android devices have an SD card slot, and the ability to move files to that SD card can free up a lot of space on your phone to allow for better overall performance. It’s super easy to transfer photos and other files to your SD card for more storage…
How to move photos and other files from your main storage to an SD card
-
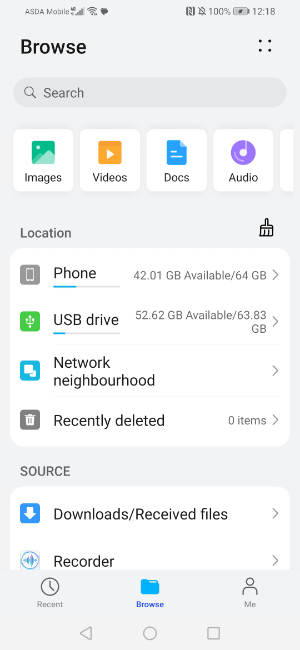
Launch the Files or Samsung My Files app.
-
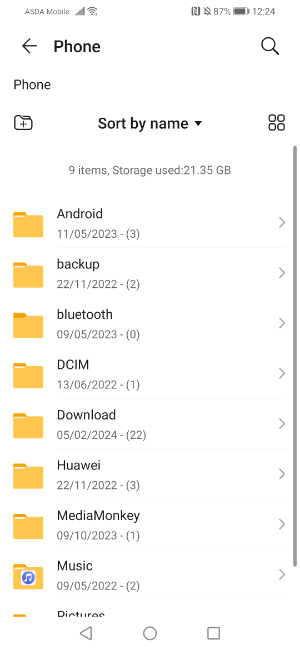
Navigate to storage – Internal Storage or Phone Storage.
-
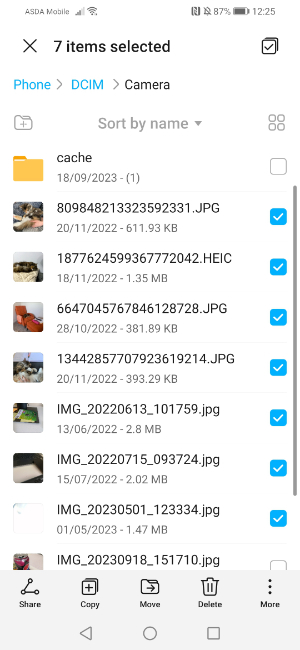
Select the photos you wish to transfer.
You can select multiple at a time, usually through either tapping and dragging or selecting photos via the tick boxes on the side of the screen.
-
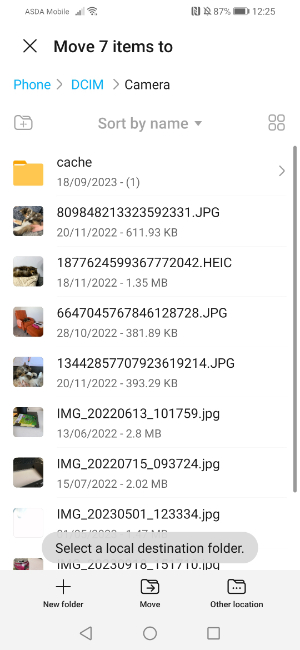
Tap "Move".
-
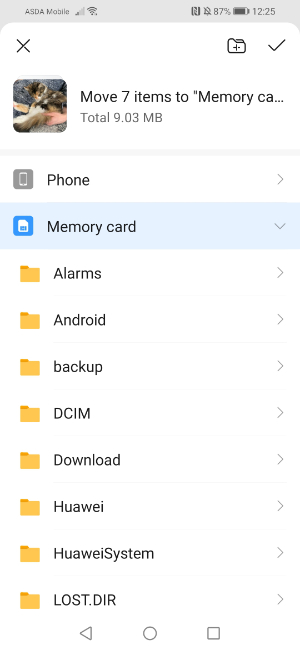
Select your SD card in the file list, and then where on your SD card you wish to save your selected photos.
-
Tap the “tick” mark in the top right corner of your phone screen.
Your selected files should now have been transferred to internal storage or phone storage, as selected. You can transfer them back to their original save location by doing the same in reverse.
Pros
- Easily select which photos are saved to your SD card or your device’s storage.
- Does not require the use of a computer.
- The location of other file types can be changed using the same method.
Cons
- Requires an SD Card slot on your phone.
- Will not preserve album structure or sometimes date order.
- Doesn’t create a backup of photos, just moves them to SD card.
- Cannot copy photos from messages.
2. Change default camera save location
You may wish to change the default storage location for photos to your SD card, which will take out the step of having to transfer everything manually. This is a time-saving solution which will enable you to have more control over the organization of your photos.
How to change the default camera save location on most Android phones
-
Navigate to your Camera app.
-
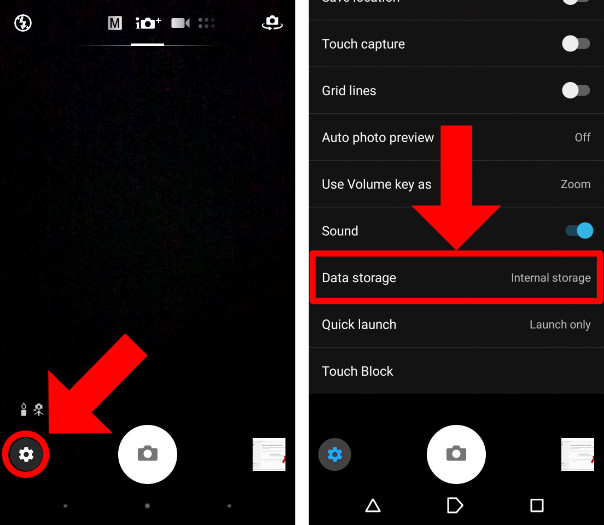
Select “Settings” (usually a cog symbol) and then tap “Data storage”.
-
Tap “SD card” or “Memory card” – from here, any new photos you take should be saved directly to your SD card.
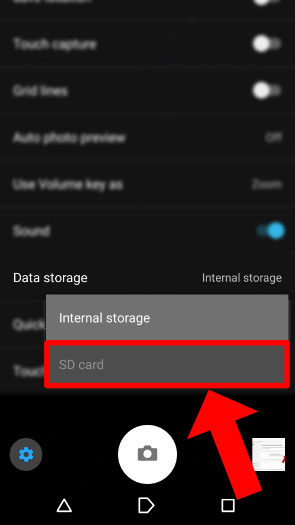
Should you wish for future photos to be saved to your phone instead you may go back and change the save location at any time.
Pros
- Photos are automatically saved to your memory card.
- Quick and easy.
- Does not require the use of a computer.
- Does not require you to manually move photos across.
Cons
- Requires an SD Card slot on your phone.
- If you wish to save to your SD card for some files and your device’s storage for others, you will need to manually toggle this before taking new photos.
- Cannot copy pictures from within messages.
- Some Android phones are unable to change the default save location.
3. Direct Transfer using an SD Card reader
Nowadays, it can be difficult to find Android devices with SD cards due to more extensive waterproofing and increased reliance on cloud storage solutions. Photos are increasing in quality and thus size, and despite internal storage increasing it’s often not enough to keep up with lots of photos. One solution for this is to use an SD card reader to store your photos on an SD card.
To use this method, you may need to enable OTG (On-The-Go) Storage in your device’s settings. You can do this by going to device Settings -> Storage -> On the go or OTG storage. If the option doesn’t appear, try connecting without – You only need to do this step on certain devices.
How to transfer photos from Android to SD Card using an SD Card reader
-
Get a USB to SD card reader.
-
Plug the SD card reader into your Android device.
-
Open the Files / My Files app.

-
Navigate to storage – Internal Storage or Phone Storage.

-
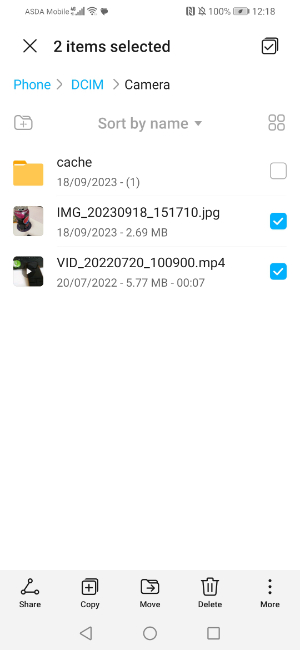
Select the photos you wish to transfer.
You can select multiple photos at a time, usually through either tapping and dragging or selecting photos via the tick boxes on the side of the screen as shown here. Once you’re done, tap “Move”.
-
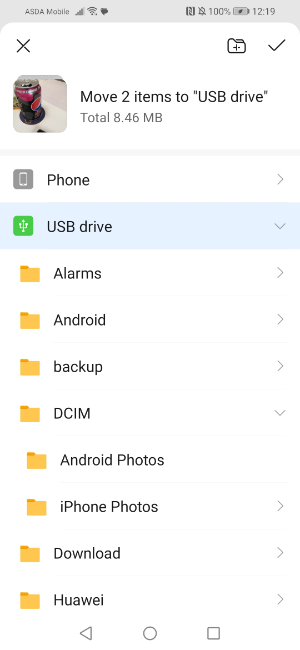
Select your SD card in the file list, and then where on your SD card you wish to save your selected photos.
-
Tap the “tick” mark to transfer your selected files to the SD card.
Pros
- Photos can be transferred quickly.
- Quick and easy.
- Does not require the use of a computer.
Cons
- SD Cards cannot be stored loose safely, so alongside an external attachment you’ll need a safe storage method for SD cards, such as an SD card holder or a wallet.
- Can get expensive because of limited storage on some SD cards.
- Cannot copy photos from messages.
4. Save Android Photos to SD Card via Your PC
Storage solutions like external SD cards, USB sticks, and hard drives can add a lot of additional clutter to your life and mean having to go through arduous setup processes every time you want to transfer files to an SD card.
Droid Transfer enables you to take the complexity out of file transfer - and all you need is a computer and a Wi-Fi connection.
This method also allows you to choose to only back up new files photos and videos that aren’t already backed up, stopping you from having duplicates taking up space on your SD cards!
How to transfer Android photos to SD Card using a PC via Wi-Fi
-
Connect your SD card to your computer.
Many computers have an SD card slot built-in, but if yours doesn't, you can use an SD card reader for this method.
-
Install Droid Transfer, and download the free Transfer Companion app.
-
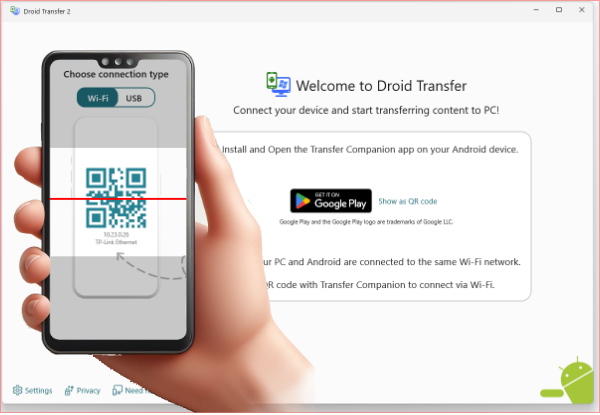
Launch Droid Transfer and using the Transfer Companion app scan the QR code in the program to connect via Wi-Fi.
-
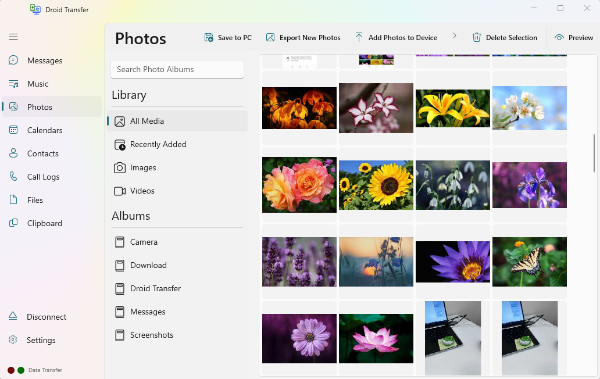
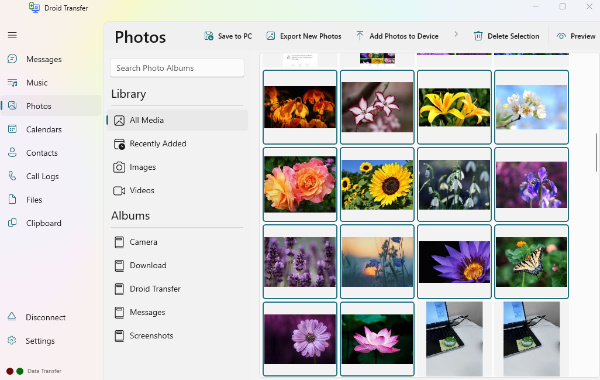
Select “Photos”.
-
Select the photos you wish to transfer to the SD card.
-
Click “Save to PC”.
-
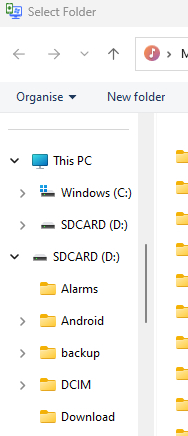
Select where to save the photos
In this case, navigate to your SD card location in the list. It should show up below “This PC”.
-
Select where on your SD card to save the files.
Your photos should now be saved to your SD card.
Optionally Droid Transfer can also save your photos, videos and other files to your PC so that if anything happens to your phone or an external storage device, you don’t need to worry about losing your files.
Pros
- Filter by photos, videos, and albums.
- Preserves album structure.
- Can copy only new photos to your SD card or your computer with the click of a button.
- Can copy photos from SMS and MMS messages.
- Can transfer other types of files too, including messages and music.
Cons
- License purchase required for full access – free demo available with 100 complimentary music or photo copies.
Watch the video to see how to transfer photos from Android to SD Card:
Conclusion
In this guide, we put together the best methods for moving photos and other media between Android and SD cards, based on our team’s extensive testing and research.
You now have all the information needed to try it out for yourself – but when choosing, consider:
- Whether you need to buy an SD card reader, or if your device already has one;
- How much time you can dedicate to the manual organization of your files. If you are short on time or not confident in transferring files manually, an app like Droid Transfer may be the best option;
- How much control you need over your gallery structure.
If you’re still not certain, here are our recommendations:
Best All-Rounder
Droid Transfer offers the most control over your gallery, allowing you to transfer your files with ease and not have to worry about manually sorting your photos into albums. This tried-and-true software simplifies copying photos and videos, letting you navigate and view your Android gallery by album, media type, and recently added photos. The app lets you know if it detects any photos you haven’t yet saved, making regular SD card backups a breeze.
Best Direct Transfer
Most Androids have compatibility with SD cards, so you can use an external SD card reader or your phone’s SD card slot and transfer photos using whichever files app you use. However, copying photos like this can be fiddly, and this doesn’t usually retain album structure.
Thanks for reading!
 Publisher:
Wide Angle Software


