Introduction
Ringtones are one of the top ways that you can really personalize your iPhone. You can set your favorite tunes to play when you receive a call or notification.
If you find the built-in ringtones lacking, you may have already purchased ringtones from the iTunes Store. However, we will also cover how to create your very own ringtones from music you already have in your iTunes or Mac Music library!
But what if you want your iPhone ringtones on your shiny new iPhone or Android phone, or even on your computer? No worries - this is easy to do, and we'll take you through the steps you need to accomplish this quickly and easily.
Quick jump to the method you're interested in by clicking a link from the list below:
- Transfer Ringtones iPhone to Computer
- Transfer Ringtones iPhone to Android
- Transfer Ringtones iPhone to iPhone
- How to change a ringtone on iPhone
- How to make a ringtone on iPhone
Method 1: Transfer Ringtones from iPhone to Computer
This first method is an essential skill to have in your toolbelt, as it's required when transferring ringtones to another iPhone or Android. When you need to copy media from an iPhone to a computer, you can't go wrong with the TouchCopy app. TouchCopy is a powerful tool that lets you copy music, messages, photos, contacts and more from iPhone, iPod and iPad to your computer — something iTunes simply can't do.


How to transfer ringtones from iPhone to your computer
- Download, install and launch TouchCopy on your computer.
- Connect your iPhone using a USB cable or Wi-Fi.
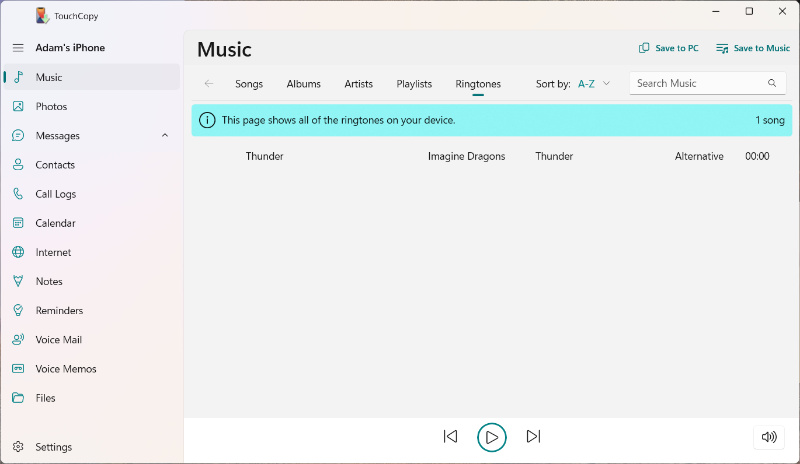
- Open the "Music" section, then click the "Ringtones" header.
- Select the ringtones you want to copy.
- Hit "Save to PC" or "Copy to Mac".
TouchCopy will show all ringtones that you purchased via the iTunes Store. You can double-click a ringtone in TouchCopy to listen to it.
If you have ringtones you created yourself, they won't show in the Music section. Find out how to access and copy custom iPhone ringtones with TouchCopy's File feature.
With the TouchCopy trial, you can transfer up to 100 music tracks FREE, including ringtones. Purchase a TouchCopy license to remove trial limitations.
What's next? You can now add your copied ringtones to a new iPhone, or add them to an Android device.
Method 2: Transfer Ringtones from iPhone to Android
Making the big switch from iPhone to Android? This can be a daunting experience with a lot to think about. If you're struggling or need some help, check out our guide to switching from iPhone to Android.
If you just need to transfer some great ringtones to your new Android phone, or if you need to copy over all your contacts, music and photos too, you can use the trusted and popular TouchCopy software.
Here's what you need to do to transfer iPhone ringtones to Android:
- Copy your ringtones from your iPhone to your computer with TouchCopy (Method 1).
- Then, safely eject the iPhone from the computer, and connect your new Android.
- Close TouchCopy and open File Explorer on your PC.
- Open the folder containing your copied ringtones.
- Make sure you can see file extensions in File Explorer. To do this, go to View > Show > tick "File Name Extensions".

- If your ringtone does not have the OGG file extension, right-click it > Rename > Ensure the file extension is OGG (.ogg).
- Transfer your ringtones to Android - copy the ringtones you've updated (select multiple ringtones by holding "ctrl" on your keyboard while clicking ringtones. Then right-click > Copy).
- In File Explorer, navigate to your connected Android device (usually listed beneath "This PC" or "My Computer").
- Open it and then find and open your Ringtones folder.
- Paste your ringtone/s into this folder (right-click > Paste).

Great! Now that your Android contains the ringtones you copied from your iPhone; you can set them in your device Settings. Settings vary from device to device, but you can generally find your ringtone settings in Settings > Sounds & vibration > Ringtone.
Method 3: Transfer Ringtones from iPhone to iPhone
If you've recently bought yourself a new iPhone, you're going to want to access your existing ringtones on it, right? This is super easy for your purchased ringtones, and there are just a few extra steps if you want to transfer custom ringtones to your new device.
Switching iPhones?
If you're moving from iPhone to another iPhone, make sure you take all you music with you, not just your ringtones! Check out our full guide on how to transfer music from iPhone to iPhone.
Transfer your purchased ringtones
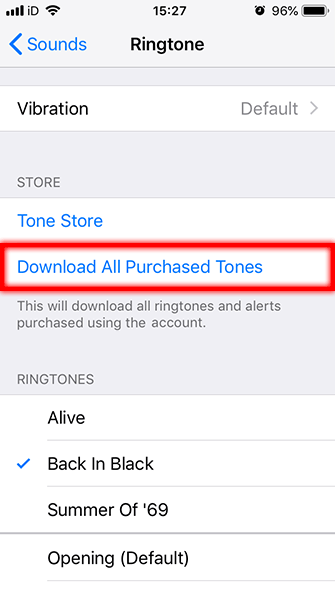
On your new iPhone, head to Settings > Sounds & Haptics > Ringtone. You'll see a "Store" section near the top of the page - tap "Download All Purchased Tones". Your device will then check for any purchases under your Apple ID and download any which are not already present on your device.
Transfer your custom ringtones
If you have ringtones that you've created yourself, ringtones that were not purchased from iTunes Store, or if you are running iOS 10 or lower, you'll need to use an alternate route to transfer ringtones from iPhone to iPhone:
- Copy your ringtones from your iPhone to your computer. To do this, follow the steps in Method 1.
- Once the copy is complete, safely eject your iPhone from the computer, and connect your new iPhone.
- Close TouchCopy and open iTunes on PC, or the Music app on Mac.
- Open the folder containing your ringtones on your computer.
- Select the ringtones you want to copy to the new iPhone.
- Add the ringtones to your iPhone:
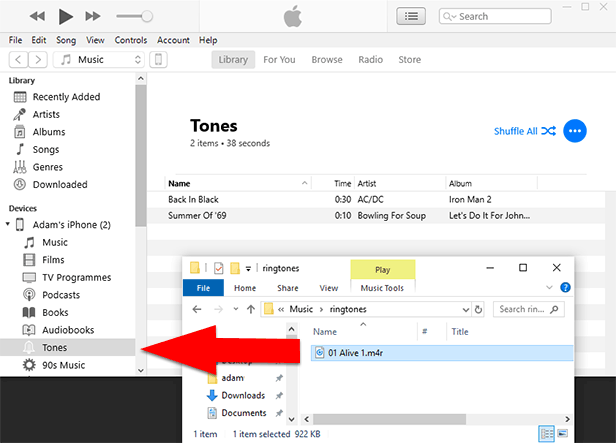
- On Windows, drag your selected ringtones into the "Tones" header under your device section in iTunes.
- If this doesn't work, Copy the ringtones, and then then Paste them into the Tones section, using Ctrl+V on your keyboard.
- On Mac, select your iPhone in the Music app, and drag your selected ringtones from Finder into the Music window.
- Your added ringtones may not appear in the window; however, they'll still show in the Ringtones list on your iPhone.
- On Windows, drag your selected ringtones into the "Tones" header under your device section in iTunes.
How to change your ringtone on iPhone
Now that you know how to add ringtones, let's see how to set a ringtone on your iPhone:
- Open Settings and tap "Sounds & Haptics".
- Select "Ringtone" or any other notification type you want to change.
- Choose a ringtone from the list to hear it, and to set it as the ringtone for your selected notification alerts.

Fun Extra
Did you know you can set a different ringtone depending on who is calling or texting you? That's right, why not set Kanye West's "Hey Mama" for when your mum calls? Or set that song which reminds you of your crazy best friend for when they call?
How to set different ringtones for different people on iPhone:
- Open Contacts on your iPhone.
- Choose a contact you want to set a ringtone for.
- Tap "Edit".
- Tap Ringtone or Text Tone to choose a tone for each notification alert.
- Once you've made your selection, tap Done to save.
How to make a ringtone on iPhone
In this section we'll show you how to create a ringtone of a song in your iTunes or Mac Music library, for you to use on your iPhone. Note that iPhones are restricted to only use files which are 0-30 seconds long as ringtones, so if you wish to use a song as your ringtone, you'll need to cut it down to your favorite bit.
First, make sure your desired song is in your library on your computer. If it's only on your iPhone, you can use TouchCopy to transfer music to iTunes or the Mac Music app.
How to create a ringtone from a song on your computer
- Open iTunes on Windows, or the Music app on Mac, and find the song that you want to turn into a ringtone.
- Right-click the song and click "Song Info" or "Get Info".

- Select the Options tab.
- Tick the Start and Stop checkboxes, then enter the ringtone start and end times (maximum 30 seconds).
- Hit OK.

- With your track still selected, go to File > Convert > Create AAC version (this will create a version of your track which uses your chosen start-stop parameters. Your original track will remain as well.)
- Next, locate the new AAC file on your computer. To make this easy, right-click the new track and click "Show in Windows Explorer" or "Show in Finder".
- Windows users: In File Explorer, go to View > Show and ensure that File Name Extensions is ticked.
- Now right-click the track > Rename > Ensure the file extension is .m4r (e.g. "My Song.m4r") for use on iPhone, or .ogg from use on Android.
- You've created your custom ringtone!
Once complete, you can once again access the info on your original track and uncheck the Start-Stop checkboxes. This will ensure that your song plays completely again when you listen to it.
Next: add your custom ringtone to your iPhone, or add your custom ringtone to your Android.
Want more tech tips like this?
Add us as a Preferred Source on Google.