How to Transfer Ringtones from iPhone to Computer with TouchCopy

Summary
TouchCopy can copy two types of ringtones from your iPhone to your computer:
- Purchased ringtones (from the iTunes Store)
- Custom ringtones (.m4r files you created or added)
If you have not done so already, you can download TouchCopy from here:


Option 1: Copy Purchased Ringtones (Music section)
- Open TouchCopy on your computer.
- Connect your iPhone to your computer via USB cable or Wi-Fi.
- In TouchCopy, open the Music section, then click the Ringtones header.
- Select the ringtones you want to copy, then click Save to PC or Copy to Mac.
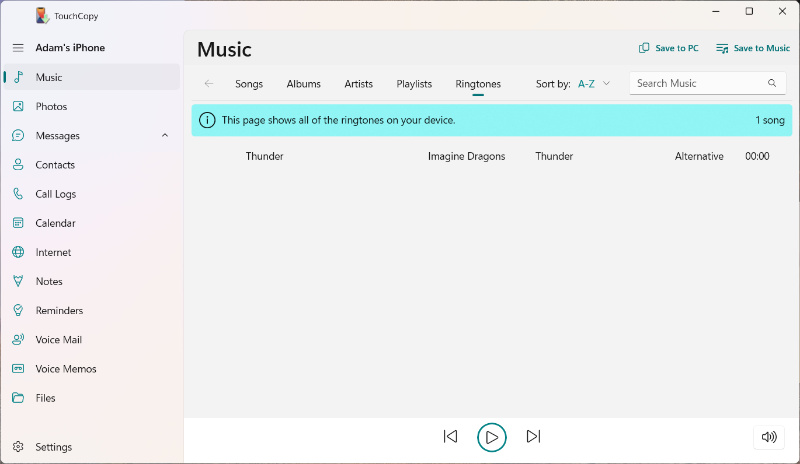
This option is best for ringtones you bought from the iTunes Store. Your copied ringtones will be saved as .m4r files on your computer. If you don't see any ringtones here, try Option 2 (custom ringtones).
Option 2: Copy Custom Ringtones (Files section)
- Launch TouchCopy on your computer.
- Connect your iPhone to your computer via USB cable or Wi-Fi.
- In TouchCopy, open the Files section and browse to iTunes_Control > Ringtones.
- Select the ringtones you want to copy, then click Save to PC or Copy to Mac.

The files ending in .m4r are your custom ringtones.
If your tones have random file names, that's normal — you can still copy them and rename them on your computer. Once they're saved to your computer, you can rename them using your computer's file manager if you wish.
For more information, check out our article on transferring ringtones from iPhone to iPhone, Android and computer. You'll even find out how to create your own ringtones!
Popular FAQs
- How do I Transfer Music from Old iPod to my New iPod or iPhone?
- Transfer Music from iPod / iPhone to a Windows 10 or 11 Computer
- How to Transfer Music from iPod to USB Stick / Flash Drive
- How to Transfer Music from iPhone to Music App on macOS
- How can I Transfer my Music and Playlists into iTunes?
- TouchCopy Failed to Copy Music to iTunes or Computer
- How to Merge Different iTunes Libraries?
- Transfer Music from Mac formatted iPod to PC
- Can TouchCopy transfer DRM protected music to my computer?
- Which iPod Song Data is TouchCopy Capable of Copying from my iPod to iTunes?
- How to Transfer Music from iPhone to Android
- TouchCopy is not Copying my Music and Playlists to my Computer
- Will TouchCopy Create Duplicates when Copying my iPod or iPhone Music?
- How do I Get Rid of the Exclamation Mark Next to the Songs I Copied to iTunes?