Why backup your iPhone?
Backing up your iPhone, iPad, or iPod Touch is essential to safeguard your photos, messages, and other precious data. Whether upgrading devices or recovering from unexpected data loss, regular backups ensure you're always prepared.
This guide covers four easy ways to back up your device and explains the benefits of each method.
Quick jump to...
Not much space on your computer?
Find out how to back up iPhone to an external hard drive.
1. Selectively backup iPhone data to your computer
If you want full control over what gets backed up from your iPhone, TouchCopy is a great solution. Unlike other backup methods, TouchCopy lets you select exactly which content—like individual photos, messages, contacts, and call history—you want to save to your computer. It can even back up items that the other methods can't, like music!
TouchCopy also offers ways to back up differentially, like only copying new photos you haven't saved before. This makes it easy to keep your backups up to date without wasting time or duplicating files.
Here's how to get started:
- Download TouchCopy on your computer and run it.
- Connect your iPhone using a USB cable or Wi-Fi.
- Browse your iPhone content using the tabs in TouchCopy.
- Select the data you want to back up to your PC or Mac, and save it!

If your computer is running low on space, you can choose to back up content to an external drive instead!
After backing up your chosen data, you may decide to delete the content you saved from your device to free up space on your iPhone. Just note: this method is for safekeeping your content—not for restoring it to a device.
Summary (TouchCopy):
- ✔ Stores files on your PC or Mac
- ✔ Can save all file types, including music and videos
- ✔ Store data up to your computer's available space (or external drive)
- ✔ Full control of what is transferred between iPhone and computer
- ✔ Ability to choose where you back up your device to
- ✔ Popular and Trusted software
- ✘ Not for restoring content to a device
2. Backup iPhone to iCloud
iCloud backups store your iPhone data in the cloud, saving computer space and enabling access from anywhere with internet access, provided you have your Apple ID. You can even set up automatic iCloud backups for whenever your iPhone is connected to power, locked and on Wi-Fi - so you don't have to worry about doing it manually.
The downsides here are that you only get 5GB of free iCloud storage space. If you need more, you'll have to pay for it. It is also worth noting that iCloud backups do not contain your music, and content that you already sync with iCloud. What does an iCloud backup include?
You can't access iCloud backups to selectively copy out specific photos, messages, etc.
Here's how to back up an iPhone with iCloud...
- Open "Settings" from the app screen on your iPhone.
- Tap your username entry and then choose "iCloud".
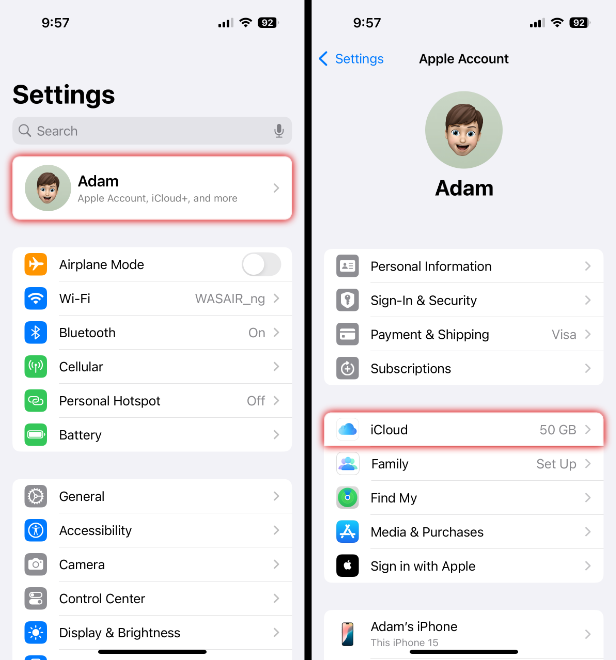
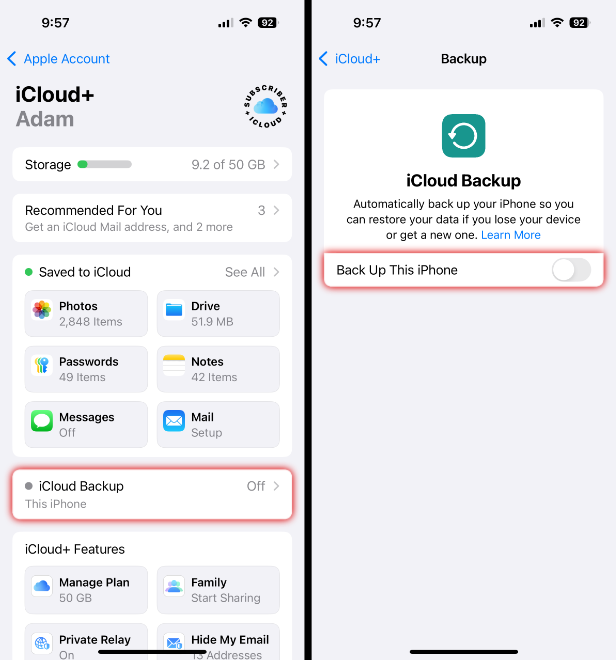
- Then, tap "iCloud Backup" and turn on "Back Up This iPhone".
Summary (iCloud):
- ✔ Stores backups in iCloud
- ✔ 5GB free storage (payment needed for more)
- ✔ Encrypted backups
- ✔ Create and use backups over Wi-Fi
- ✔ Able to use backup to restore to iPhone
- ✘ Can't choose what to back up
- ✘ Can't selectively access the content from the backup
3. Backup iPhone using iTunes or Apple Devices
Backing up with iTunes or the Apple Devices app is similar to the iCloud backup, in that you can use the backup to restore the snapshot to your iPhone. The difference here is that the iPhone backup will be stored on your computer, rather than in the cloud- so you don't have to worry about paying for extra space, but you won't be able to access the backup over Wi-Fi on another computer.
- Launch iTunes or the Apple Devices app on your computer.
- Connect your iPhone.
- If using iTunes, click your device icon to access your device summary.
- Apple Devices will automatically take you to the device summary.
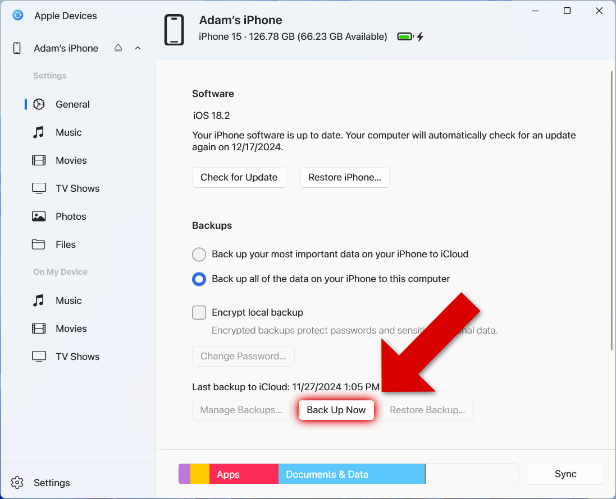
- Select "Backup all of the data on your iPhone to this computer".
- Optionally, tick "Encrypt local backup" to protect the backup with a password.
- Under "Backups", click "Back Up Now".
Backups made in iTunes or the Apple Devices app contain most of your device's content, as detailed by Apple. Data that is not saved includes data synced by iTunes (like imported music, videos and books) and content synced with iCloud (like iCloud Photos). This data can be selectively saved to your computer with TouchCopy, as described in section 1.
Extra: Find out where iTunes stores your backups.
Summary (iTunes / Apple Devices):
- ✔ Stores backups on PC or Mac
- ✔ Optional backup encryption
- ✔ Create and use backups on your PC or Mac
- ✔ Able to use backup to restore to iPhone
- ✘ Can't choose what to back up
- ✘ Can't selectively access the content from the backup
4. Backup using Finder on macOS Catalina and higher
Our final method covers those of you who are using macOS Catalina, Big Sur, Monterey, Ventura, Sonoma, Sequoia or Tahoe. As you may have noticed, iTunes was replaced by the Music app on macOS Catalina and newer. As such, the steps to back up your iPhone have changed slightly.
Rather than using iTunes to back up your iPhone, you'll need to use the Finder app. Here's how it's done:
- Launch Finder on your Mac.
- Connect your iPhone.
- Select your device from the list.
- Choose "Back up all the data on your iPhone to this Mac".
- Optionally, tick "Encrypt local backup" to protect the backup with a password.
- Click "Back Up Now".
Extra: Find the location of your Finder backups.
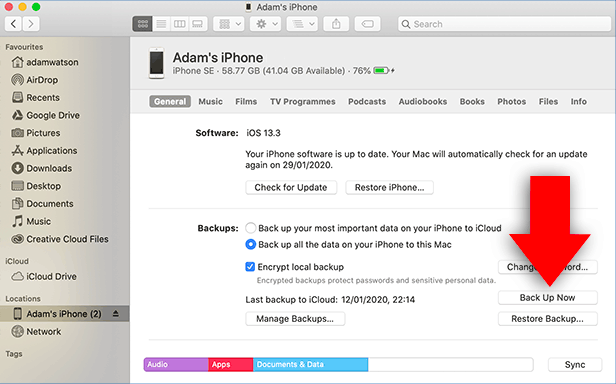
You can also choose to back up your iPhone to iCloud from here. To do this, simply choose "Back up your most important data on your iPhone to iCloud" before clicking "Back Up Now".
Note: If you wish to save Health and Activity data from your device, you'll need to encrypt your backup. To do this, click the "Encrypt device backup" checkbox. You'll be prompted to set a password to protect your encrypted backup. Make sure you keep your password safe, as you'll need this to access or recover your encrypted backup.
Summary (Finder):
- ✔ Stores backups on Mac
- ✔ Optional backup encryption
- ✔ Create and use backups on your PC or Mac
- ✔ Able to use backup to restore to iPhone
- ✘ Can't choose what to back up
- ✘ Can't selectively access the content from the backup
Extra: How do I restore my new iPhone from backup?
If you are getting a new iPhone and you want to transfer your data from your old one, you can do so with a backup of your old device.
Setting up your new iPhone with your backup means that your new iPhone will have all your music, photos, messages and other app data right from the off!
To do this, back up your old iPhone to iCloud, Apple Devices, iTunes or Finder using the methods above. Then, when setting up your new iPhone, on the "Apps & Data" screen, choose to Restore from your iCloud or iTunes backup.
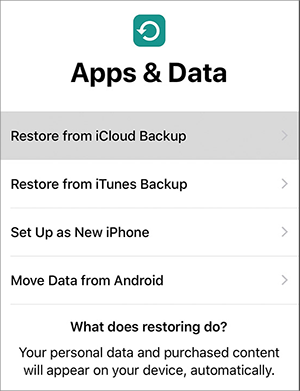
For more information, see Apple's guide on how to set up your new iPhone from a backup.
Restoring an encrypted backup
To restore a local encrypted backup made in iTunes, Apple Devices or Finder, you'll need to enter the backup password. If you don't remember it, you can reset the backup password on your iPhone with the Settings app. You can then make a new unencrypted backup, or set a new password to create a new encrypted backup.
Takeaways
Regularly backing up your iPhone is essential—and thankfully, it's easy with the right tools. Here's a quick recap to help you choose the best method:
- TouchCopy - Ideal if you want full control over what you back up and direct access to your files on your computer. Great for saving space on your iPhone.
- iCloud - Best for automatic, wireless backups stored in the cloud. You can easily restore your device from these backups.
- Finder / Apple Devices app / iTunes - Use these for local backups on your computer that you can restore from when needed.
 Publisher:
Wide Angle Software


