Your iPhone contacts are essential - they're your digital address book of family, friends, and professional connections. Whether upgrading to a new iPhone or transferring selected contacts to another device, this guide shows you multiple ways to transfer your contact list, including both iCloud and alternative methods.
Quick jump to the 6 reviewed options:
Lost or deleted contacts?
What happens if your device gets lost or damaged, or you accidentally delete some contacts?
Find out the best ways to recover deleted contacts on iPhone.
1. How to Transfer Contacts from iPhone to iPhone with Contact Transfer
The simplest way to transfer your contacts without relying on online sync methods like iCloud is by using the Contact Transfer app.
This handy tool enables you to securely and efficiently move contacts between devices via your PC. Currently, Contact Transfer is available for Windows 10 and 11 users only.
This method does not require any backups or restores, so there is no chance of losing your data.
Let's see how it's done...
- Download and install Contact Transfer on your PC, then launch it.
- Choose "iOS Device" as both the Source and Destination, then click Continue.
- Use USB cables to connect both iPhones to your computer.
- Once the iPhones are detected, click Continue.
- Browse the contacts stored on the source iPhone. Select all contacts by ticking "All" or select individual contacts by clicking the checkbox next to them.
- Click Transfer to start copying your selected contacts from the source device to the destination device.
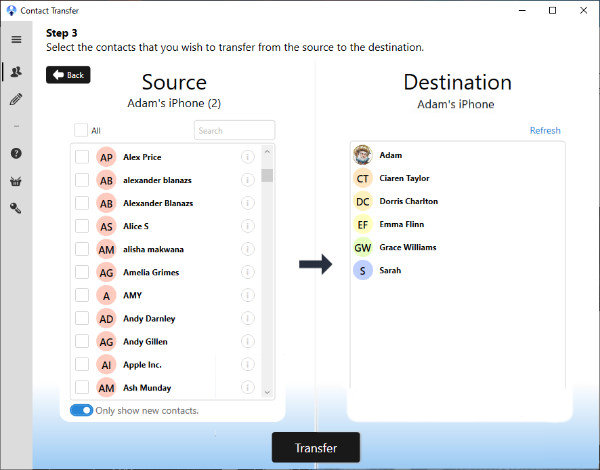
Once the transfer is complete, you can find your newly copied contacts in the Contacts app on the destination iPhone!
Apart from the fact that you can seamlessly copy contacts between iPhone, Android and PC using Contact Transfer, it also offers some handy bonus features:
- Create new contacts and save them to your device.
- Edit your existing contacts from the comfort of your PC.
- Delete contacts, individually or in bulk.
Summary (Contact Transfer):
✔ Transfer contact straight from iPhone to iPhone through your PC
✔ Local Transfers - no cloud or sync required
✔ Transfer all contacts, or select your desired contacts
✔ Full control of what is transferred
✔ Bonus features
2. How to Transfer Contacts from iPhone to iPhone with iCloud
Using iCloud is an excellent option if you have limited space on your computer. Files stored in iCloud are securely saved by Apple and can be accessed on any device linked to your Apple ID. Additionally, you can configure your iPhone to back up manually to iCloud (learn more about backing up your iPhone).
The downsides here are that you only get 5GB of free iCloud storage space. If you need more, you'll have to pay for it. Also, you can't access data from iCloud backups manually to copy out specific contacts, songs, or messages, which is possible if you choose the TouchCopy method.
What is backed up in an iCloud backup?
There are two approaches to moving contacts to your new iPhone: restoring from a backup or merging contacts from iCloud with existing ones on your device.
Restore Contacts from an iCloud Backup
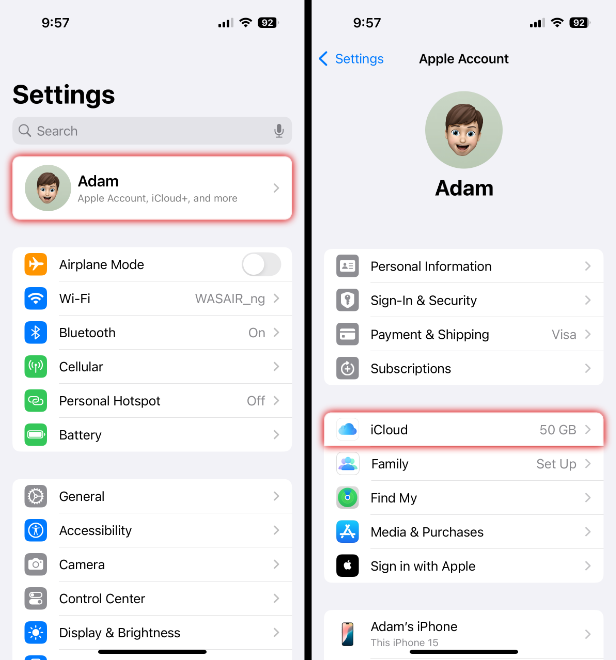
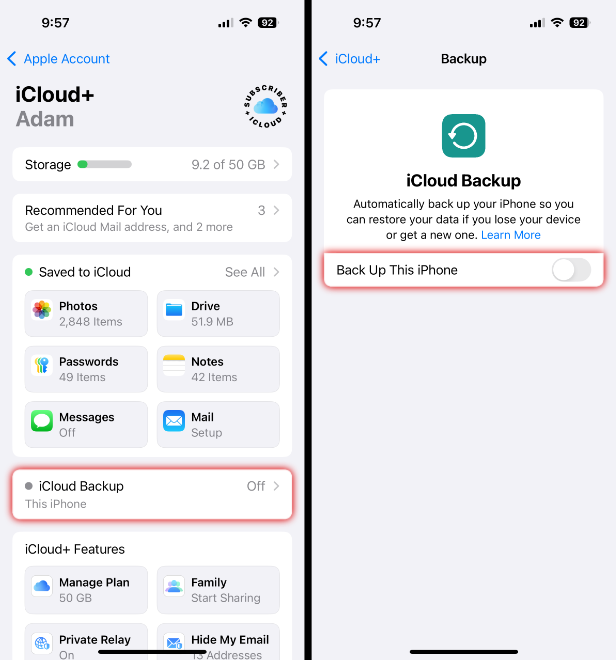
- Make a backup of your old iPhone: Settings > your username > iCloud > Backup > Ensure "iCloud Backup" is enabled > Tap "Back Up Now".
- Restore the iCloud backup to your new iPhone: (on your new iPhone) Settings > General > Reset > Erase All Content and Settings > Erase iPhone > Set up the iPhone until you access the Apps & Data screen and choose to Restore from iCloud > Select the backup you just created.
Note: Restoring an iCloud backup replaces all current data on your new iPhone with the data from the backup. For more flexibility in transferring specific data, consider using TouchCopy, or you can Merge Contacts from iCloud.
Merge Contacts from iCloud
To use this method, first ensure that your contacts are backed up to iCloud from your old iPhone. To do this, on your old iPhone, go to Settings > your username > iCloud > iCloud Backup > tap "Back up Now". You'll need enough free space in iCloud to contain the new backup.
Tip: Transfer only the contacts you need
Before transferring your contacts to a new iPhone, it's a good idea to clean up any outdated or duplicate contacts. Learn how to delete multiple contacts from your iPhone to keep your address book organized before making the switch.
Once you have your contacts backed up in iCloud, you can transfer them to your new iPhone:
- Ensure the new iPhone is connected to Wi-Fi and is logged in to your Apple ID.
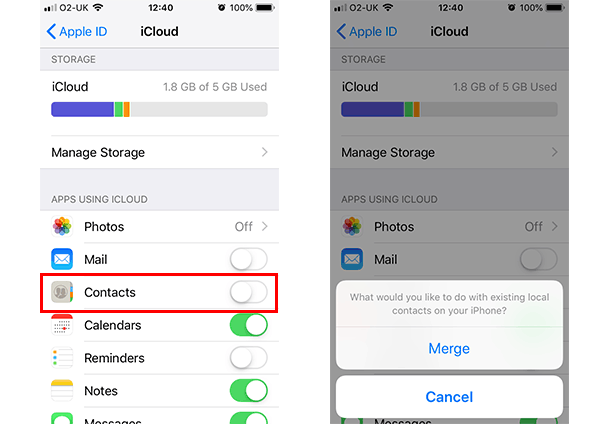
- Go to Settings > Tap your username > iCloud > Toggle "Contacts" to enable.
- Select Merge when asked, "What would you like to do with existing local contacts on your iPhone?".
- Your Contacts will start transferring from iCloud to the new iPhone!

Summary (iCloud):
✔ Stores backups in iCloud
✔ 5GB free storage (payment needed for more)
✔ Encrypted backups
✔ Create and use backups over Wi-Fi
✔ Able to use backup to restore to iPhone
3. How to Transfer Contacts from iPhone to iPhone without iCloud: TouchCopy
This method is for those users who like complete control over their data. If you want to access your iPhone contacts from your computer, without any online uploads or cloud activity, TouchCopy is for you.
With TouchCopy you can browse your iPhone's content on your PC or Mac. Then, you can choose what to copy from your device to your computer. Transfer music from iPhone to PC, backup contacts, save messages as PDF or print them off, TouchCopy can do it all.
In this way, you can copy all your iPhone contacts to your computer. Then, if you want to transfer those contacts to a new iPhone, simply sync them with iTunes or Finder!
Here's how to transfer contacts from iPhone to iPhone without iCloud:
- Download TouchCopy on your computer and run it.
- Connect your iPhone to your computer using your USB cable.
- Open the "Contacts" section in TouchCopy.
- Copy your contacts as CSV if using a PC, or directly into the Contacts app on Mac.
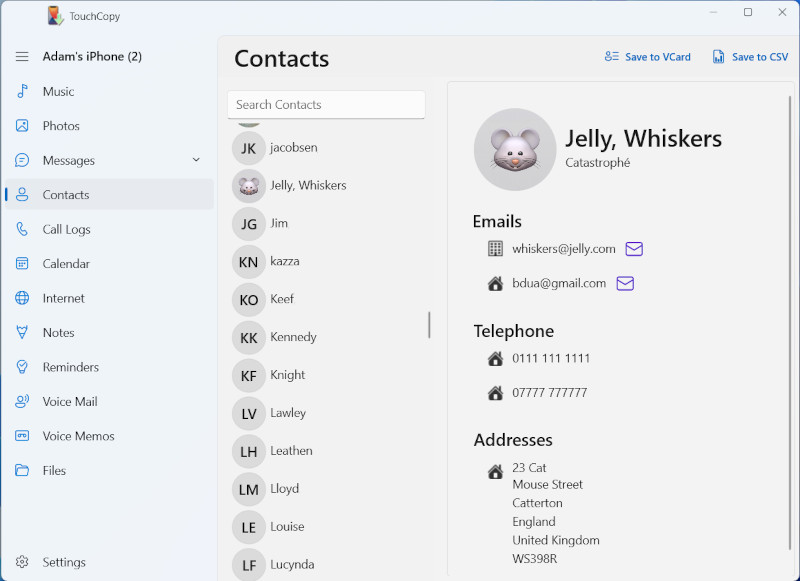
If you've saved your contacts to Windows PC (as CSV), you'll need to import the CSV into a contact manager like Outlook or Windows Contacts.
- Open iTunes (or Finder on Mac) and connect your new iPhone.
- Select your device > Info > tick "Sync Contacts...".

- Select an app to sync contacts from (PC only), and choose whether to sync all contacts or only selected groups.
- Click "Apply" to transfer!
Be advised that iCloud needs to be disabled for contact syncing to work. To disable iCloud Contacts on your new iPhone, go to "Settings" > Your username > "iCloud" and next to "Contacts" ensure that iCloud is toggled off.
Find out more about syncing with iTunes >
Summary (TouchCopy):
✔ Stores files on your PC or Mac
✔ Local Transfers
✔ Transfer only what you need to your computer
✔ Full control of what is transferred between iPhone and computer
✔ Popular and Trusted software
4. How to Transfer iPhone Contacts via AirDrop
AirDrop is fantastic for quickly transferring files between iPhone and iPhone or Mac. When your iPhones are using the same Wi-Fi network, simply choose a file and share it via AirDrop.
The major drawback here is that you can only AirDrop 1 file at a time unless you create a new list of all the contacts you want to transfer.
If you need to transfer a whole load of contacts, consider a different method. If you only need to do a couple of quick transfers, here's how to transfer contacts from iPhone to iPhone using AirDrop...
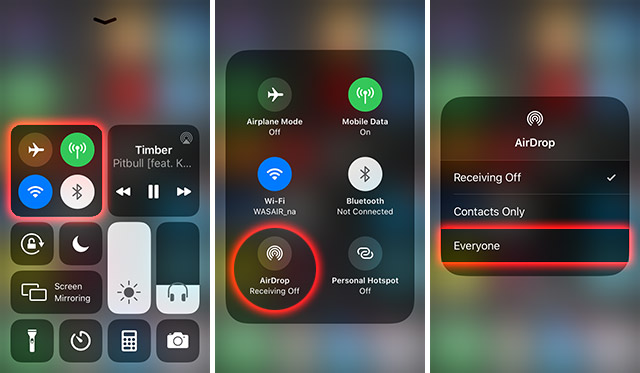
- Turn on AirDrop on both iPhones
- Open Control Center by swiping from the bottom of your screen, or from the top if your iPhone has Face ID.
- Tap and hold the wireless control box to access more options.
- Tap the AirDrop icon and select "Everyone".
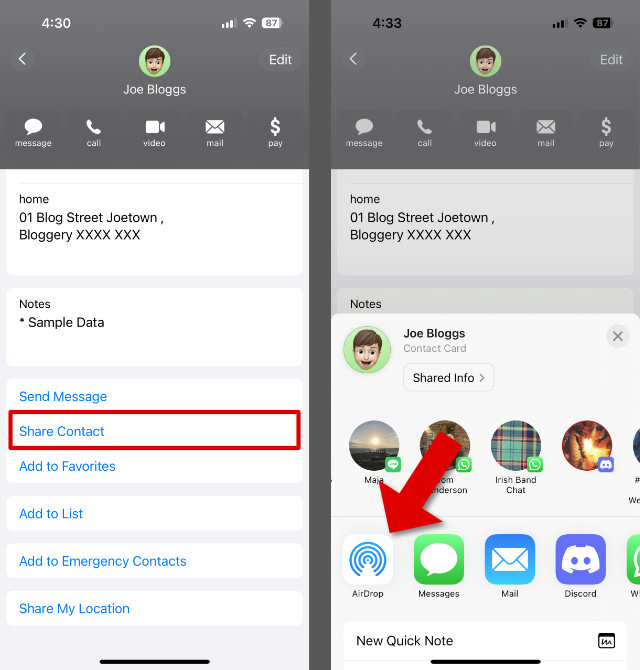
- Next, on the iPhone containing your contacts, open the Contacts app.
- Select a contact you want to transfer, then tap "Share Contact".
- Tap AirDrop, then tap your target iPhone when it is detected.
- Your target iPhone will receive a notification. Tap to accept the contact file!
Accepting the contact file will save the contact directly into the Contacts app on the target iPhone.
Send multiple contacts from iPhone to iPhone with AirDrop
As you can see in the steps above, there is no way to select multiple contacts to send to your new iPhone via AirDrop.
To send a batch of contacts at once, you'll need to send an existing contact list (or create a new contact list containing only the contacts you want to transfer).
To access iPhone contact lists, open the Contacts app on your iPhone, then tap 'Lists' at the top of your screen. Here you'll see any existing lists.
Tap 'Add List' and name your list. Then, select your new list and tap 'Add Contacts'. Select the contacts you'd like to add, and then tap Done.
How to transfer multiple contacts via AirDrop
- Open the Contacts app on your iPhone and tap Lists.
- Tap and hold the list you want to send.
- Choose "Export", select the fields you want to include, then tap Done.
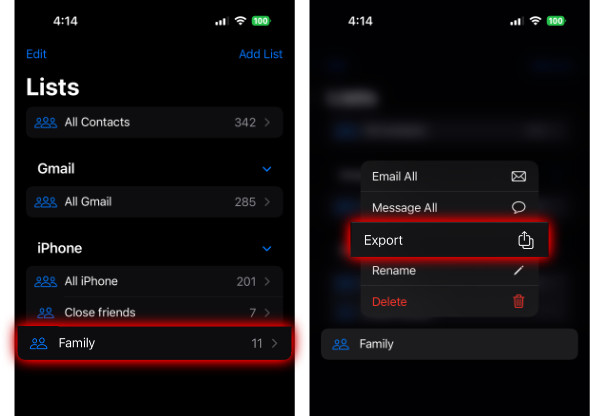
- Tap AirDrop and select the device you want to send the contact list to.
- On the receiving iPhone, accept the contacts and choose to add them to the device.
Summary (Airdrop):
✔ Quick and Easy
✔ Free
✗ Requires Wi-Fi
✗ Not ideal for bulk transfers
5. Share iPhone Contacts via Mail or Message
You can also share contacts between iPhone and iPhone using email or text message. This method has the same drawback as Airdrop - you can only share a single contact at a time (unless you create a contact list). To transfer contacts in bulk, I would recommend using Contact Transfer.
Sending a contact via Mail or Message will export the contact as vCard (a standard contact format).
Let's see how to share a contact between iPhone and iPhone using Mail...
- Open the Contacts app on the iPhone containing your contacts.
- Find and select your desired contact.
- Scroll down and tap "Share Contact"
- Choose Mail.
- Enter the email address you will be using on your new iPhone and tap Send.
Once you have sent your contact via email, grab your target iPhone and open the email in the Mail app.
Tap to download the attached vCard in the email. The contact will open in your Contacts app, but it will not yet be added to your Contacts list.
To save the contact to your iPhone, tap "Create New Contact". Here, you can make any changes to the contact and hit "Done" when you're finished.
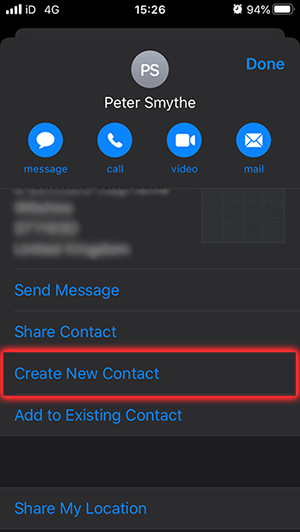
Similarly, you can choose to share the contact via Messages, WhatsApp or other messaging services.
Summary (Mail or Message):
✔ Quick and Easy
✔ Free
✗ Requires Wi-Fi
✗ For single contacts only (no bulk transfer)
6. Share your contact card with a tap using NameDrop
Introduced in Apple's iOS 17.1 update, the NameDrop feature allows you to share your contact information with another person by simply bringing your iPhones together.
Of course, this feature isn't designed for bulk transfer, but it's really cool for quickly exchanging contact details with another person you are with. Here's how it works...
- Turn on Wi-Fi, Bluetooth and AirDrop on both iPhones.
- Hold your iPhone so that the top of the screen is a few centimetres from the top of the other iPhone.
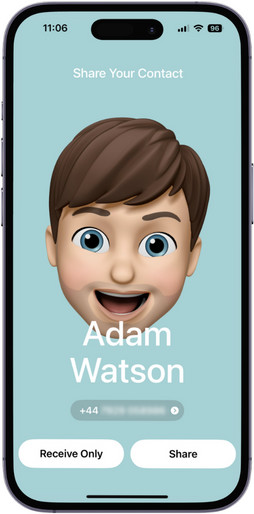
- Your contact card will appear on your screen when a connection is made.
- Share contact details:
- Receive Only: Only receives the other person's contact card. This option will not share your own contact details.
- Share: Send your contact card to the other person, at the same time as receiving their contact card to your iPhone.
Summary (NameDrop):
✔ Quick and Easy
✔ Free
✗ Requires Wi-Fi, Bluetooth and AirDrop
✗ For single contacts only (no bulk transfer)
Takeaways
So now you know the 6 best ways to transfer contacts from iPhone to iPhone.
As you can see, they each have their pros and cons, but you should now have all the knowledge you need to be able to pick the best one for you.
To do a quick share of a single contact, we recommend using AirDrop as it's super quick and easy.
Whereas, if you need to transfer a whole address book full of contacts, you'll benefit more from the help of the Contact Transfer app.
Thanks for reading!
 Publisher:
Wide Angle Software


