In most cases, simply connecting your Android device to your PC with a USB cable should establish a connection with Droid Transfer (after completing the initial setup as detailed in our quick-start guide).
If you're encountering issues with the USB connection, follow the steps below to resolve them.
Tip: When using a USB connection, do not scan the QR code in Droid Transfer. Scanning is only necessary when connecting over Wi-Fi.
Verify that you're using the latest version of both Droid Transfer 2 AND Transfer Companion. You can check for updates in Droid Transfer Settings -> Updates.
Note: If you are using Droid Transfer 1, you'll need an older version of the Transfer Companion app. Find out how to get Transfer Companion 4.
Keep your phone's screen active with the Transfer Companion app open while using Droid Transfer. Avoid navigating away from the app.

Disable mobile data on your Android device during the connection. Mobile data can sometimes interfere with a USB connection. You can re-enable it after disconnecting.
Ensure your Windows Firewall is properly configured. Follow the instructions on how to configure Windows Firewall to allow Droid Transfer to connect to your phone.
Restart both your PC and Android device, then attempt the connection again. This can often resolve any lingering issues.
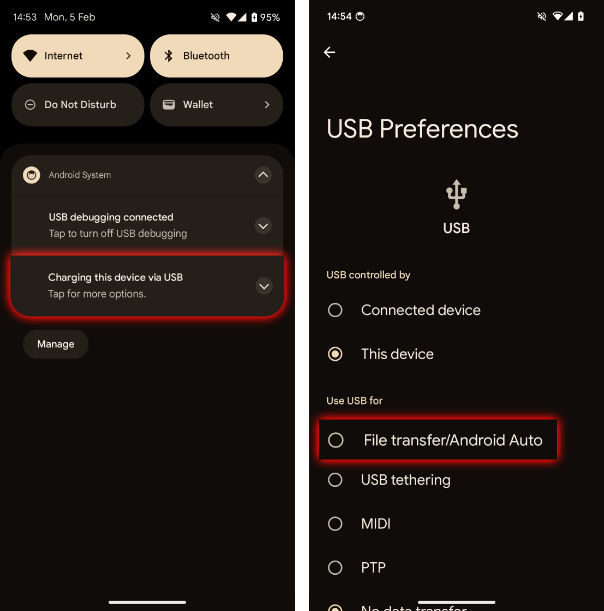
Check the USB settings on your Android device. Swipe down from the top of the screen, tap the "Charging this device via USB" notification, and select "File Transfer" under USB Preferences.

Verify that your device appears in Windows File Explorer when connected. If it doesn't, the issue may be related to the USB cable, port, or drivers.
If the USB connection still doesn't work after following these steps, try connecting your device via Wi-Fi instead.

 Droid Transfer 2
Transfer and manage your Android device media from your Windows PC.
Learn more Download