This guide explains how to customize iBackup Extractor using the "Settings" (PC) or "Preferences" (Mac) menu. You can access these options from the toolbar on the left-hand side of the app.
iBackup Extractor settings covered in this guide:
Copy Settings (Copy to PC/Mac)
Default "Save files to" path: Whenever you save or extract files from your backups, this path will be selected by default to save you time. You can click the "Browse" button and select a different location.
To always use this folder, uncheck "Request Save destination before each copy operation" (PC) or "Show message to select save location before copying" (Mac).
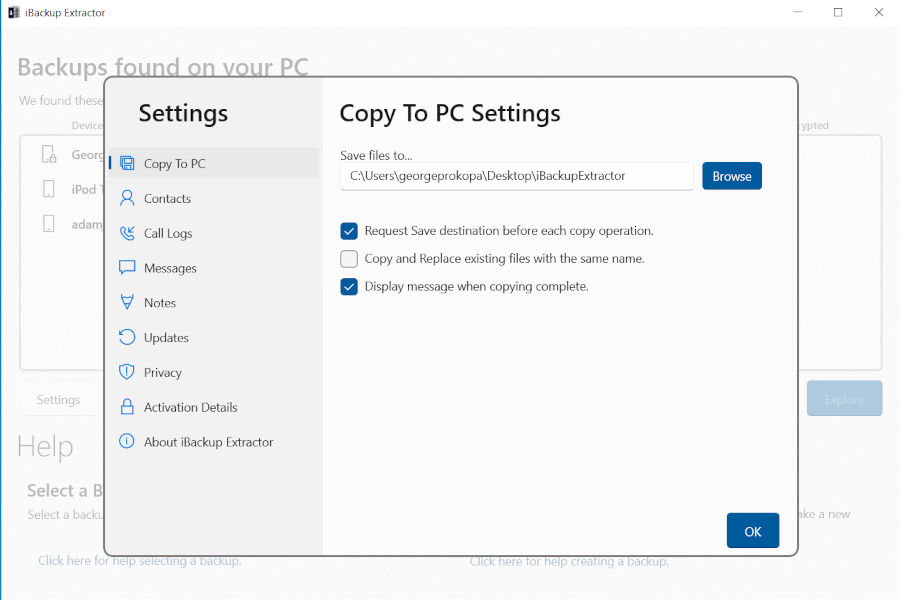
Copy and replace existing files with the same name: With this option enabled, existing files in your chosen location will be replaced with files with the same name during your copy. While disabled, a new file will be created, without overwriting the existing file.
Show message when copying complete: Enable this option to receive a notification when copying finishes.
Backup Media Settings (PC only)
When saving HEIC images, you can choose to save original HEIC files, convert them to JPG, or both.
Contacts Settings
Sort Options (PC only): Choose to sort your contacts by first name or last name.
On Mac, you can change this order in the Contacts feature itself, by using the "Sort Order" button.
Export Options:
- Format CSV documents (PC only): Optimize exported CSV files for use with Outlook or Google Contacts.
- Combine multiple contacts into a single file (Mac only): Merges selected contacts into one vCard file for easier importing into other apps.
Call Logs Settings
Sort Options: Choose to sort your call log list by Name (alphabetically), or by when they were Last Updated. You can also order the calls within a log from oldest to newest or vice versa.
Limit Options: Limit the number of logs displayed in iBackup Extractor. For example, setting this to "10" shows the most recent 10 days' of call logs available in your backup.
Contacts (Mac only): Include or exclude the contact number for each call log entry.
Export Options: With merging enabled, you can select call logs from multiple contacts and save in a single file.

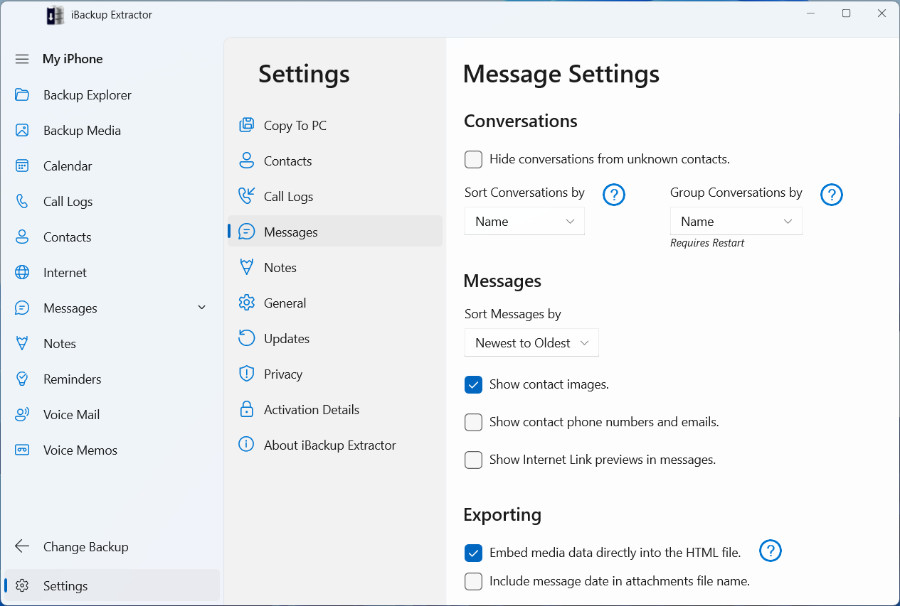
Messages Settings
Limit Options (Mac only): Set how many days of messages are loaded into view. This is especially useful for users who have slower machines - loading only a few of the most recent messages of a large conversation can drastically reduce load times.
Search Options: Using the dropdown box, choose what you'd like to search in the Messages feature.
- Conversations: Search by contact name (e.g. "Joe Bloggs" to find your conversation with Joe).
- Conversations and Messages: Search within message content (e.g. "wedding" if you want to find messages about a wedding).
Sorting & Ordering:
- Set the order of the list of conversations in the Messages feature.
- Order the messages in each conversation by newest to oldest, or oldest to newest.
- Hide or show conversations from unknown contacts.
Displaying contact information: Choose to include contact image, contact number and internet link previews in your message exports.
Export Options:
- Export font size: choose the size of the font used in your message exports (small, regular, large, largest).
- Compact layout: Reduces the white space in exports, meaning you will use fewer pages when printing.
- Embed media in your HTML file: Save images and media inside the HTML file, or in a separate folder.
- Include the date in attachment file names: if you choose to save your attachments separately, the message date will be added to the exported attachment names.
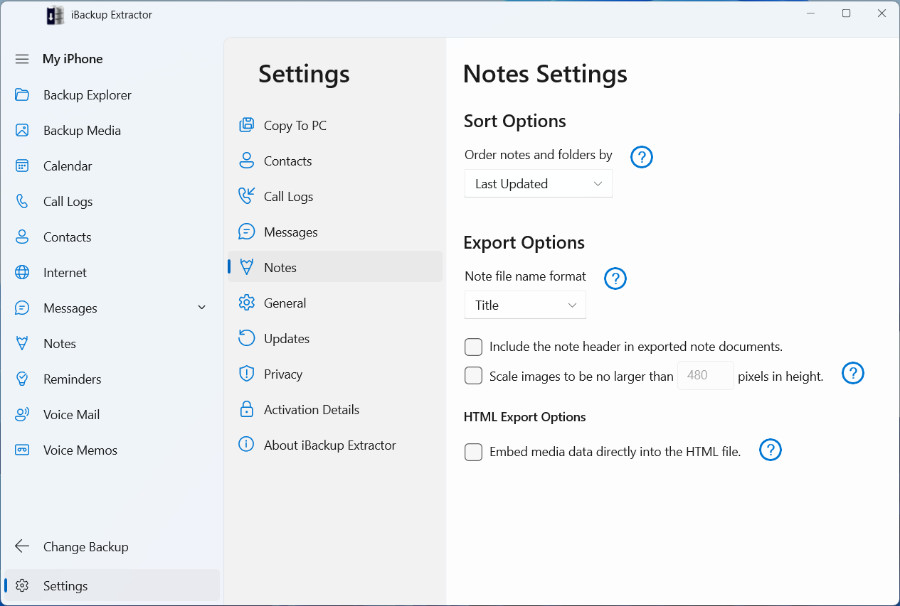
Notes Settings
Folders (PC only): Choose whether note folders are expanded automatically when opening the Notes feature.
Sort Options (PC only): Sort notes by Name or Last Updated.
Export Options:
- File name format: Save notes using the note name only, or include the date.
- Scale images (PC only): Set a maximum height for embedded images in exports.
- Embed media in HTML (PC only): Save images within the HTML file, or in a separate media folder.
Change where iBackup Extractor looks for Backups
iBackup Extractor automatically searches for backups on your computer when you launch the program.
If your backups are not stored in the default location on your computer, you can direct iBackup Extractor where to look for them.
- Mac: Go to iBackup Extractor's Preferences > Backups, then choose the folder containing your backups. Restart iBackup Extractor to load the new location.
- PC: Relaunch iBackup Extractor and click “Change Backup Directory...” to select your backup folder.
Note: You'll need to select the folder containing your iOS device backups - not the backup itself.
General (PC only)
The General tab is where you can set your preferred language for the app. To do this, click the dropdown box and select your language. Once done, you'll need to restart iBackup Extractor for the change to take effect.
Updates
Check to see if there are any new updates for iBackup Extractor. If an update is available, you'll have the choice to download it.
You can also choose to automatically check for updates whenever the program starts.
About iBackup Extractor
Contains information such as the version of iBackup Extractor that you are currently running. If you need support with the software, one of our representatives may ask for this information to help with your request.
Activation Details
If you purchased a license from our website, you will have received an activation code in your order confirmation email. You can activate iBackup Extractor using this code, or access your activation details here if you've already activated.
To activate, deactivate or find your details, click "Activation Details" on PC, or "License" on Mac.
Deactivating your license frees up the activation slot so that you can activate it on a different computer.
Note: If you purchased iBackup Extractor from the Microsoft Store or Mac App Store, you will not receive an activation code, as the activation process is handled by the respective app stores.